Guiding
The Guiding screen controls your autoguider, which monitors a star through a guide camera and sends corrections to the mount to maintain accurate tracking. ARIS runs PHD2 — the industry-standard guiding engine — directly on the rig, and provides a full guide interface on top of it: PHD2 profiles, star selection, live guide graph, star profile, settling, and aggressiveness tuning.
Guide Camera Setup
Section titled “Guide Camera Setup”Star Selection
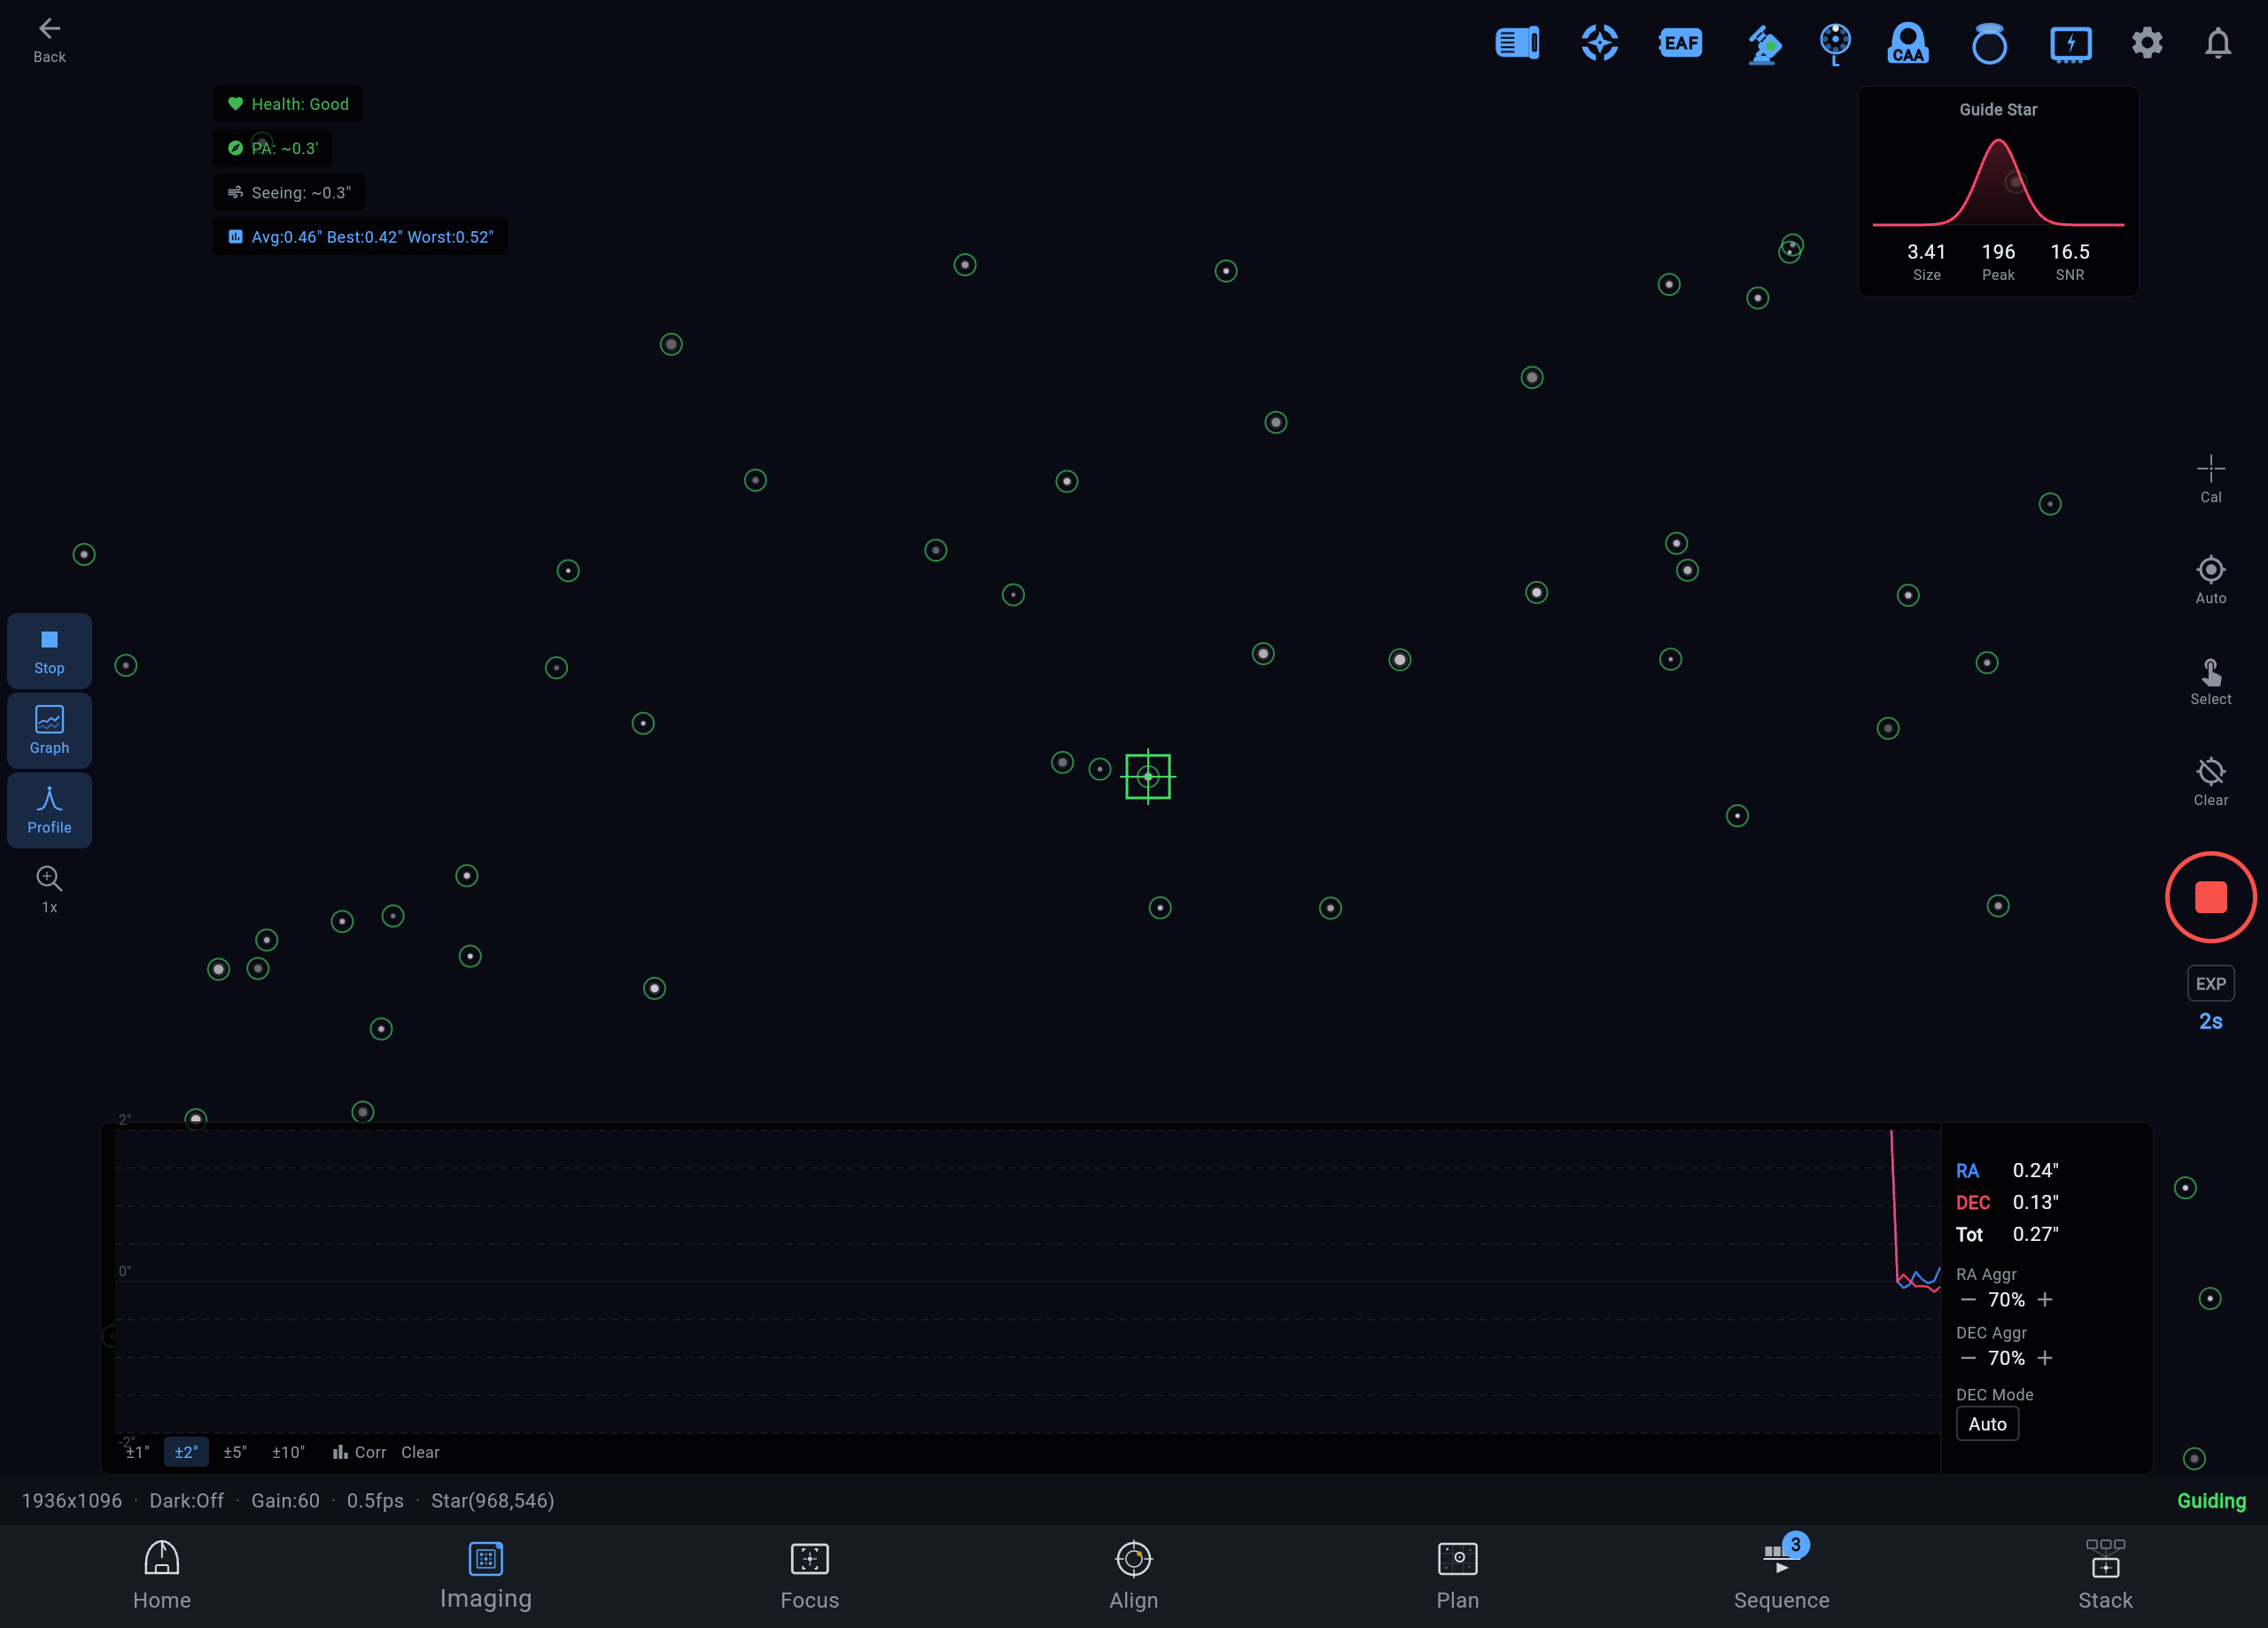
Section titled “Star Selection”When you open the Guiding screen, the guide camera view displays the field with detected stars. ARIS auto-selects a suitable guide star near the center of the frame based on brightness and isolation.
To select a different star, tap it directly in the camera view. A good guide star is:
- Bright but not saturated — Check the star profile (see below) to confirm the peak is not clipped.
- Isolated — No nearby stars that could confuse the centroid calculation.
- Away from the edge — Edge stars can drift out of frame as the mount tracks or reacquires after a slew.
Exposure and Gain
Section titled “Exposure and Gain”- Exposure — Set the guide camera exposure using the wheel picker. 1-3 seconds is typical. Shorter exposures give faster correction response but may not have enough signal for faint guide stars. Longer exposures smooth out seeing but slow down the correction loop.
- Gain — Set high enough to clearly see guide stars without saturating them. The guide camera usually runs at higher gain than the imaging camera.
Tap the zoom button to cycle through 1x, 2x, and 4x magnification on the guide camera view. Higher zoom helps verify star selection and check for elongation or double stars.
Calibration and Guiding
Section titled “Calibration and Guiding”Starting Calibration
Section titled “Starting Calibration”Before guiding can begin, the system must calibrate by moving the mount in each axis and measuring the response.
- Select your guide star.
- Tap Guide. If the system has not been calibrated (or calibration has been cleared), it runs calibration automatically before starting to guide.
- During calibration, you will see the mount make small moves in RA and Dec while the system measures the guide star displacement. This takes 30-60 seconds depending on your settings.
- Once calibration completes, guiding begins immediately.
Stopping Guiding
Section titled “Stopping Guiding”Tap the Stop button to halt guiding. The guide camera continues looping frames so you can monitor the field, but no corrections are sent to the mount.
Guide Graph
Section titled “Guide Graph”The guide graph is the primary tool for evaluating tracking performance. It plots correction errors over time for both axes.
- RA (blue line) — Right Ascension tracking error in arcseconds. Periodic error from the mount shows as a repeating sine wave. Wind appears as irregular spikes.
- Dec (red line) — Declination error in arcseconds. Should be relatively flat for a well-aligned mount. Persistent drift indicates polar alignment error.
- RMS values — Displayed above the graph for each axis and combined total. Lower is better. Sub-arcsecond total RMS is good; sub-0.5” is excellent for long focal lengths.
- Scale — The graph auto-scales based on the error range.
Toggle the graph visibility from the toolbar. The graph can be dragged to reposition it on screen.
Star Profile
Section titled “Star Profile”The star profile panel shows a 3D surface plot of the guide star’s intensity distribution. Use it to verify:
- Symmetry — A well-focused, round guide star produces a symmetrical bell curve. Asymmetry may indicate optical issues or a double star.
- Saturation — A flat-topped profile means the star is saturated. Reduce exposure or gain, or pick a dimmer star.
- SNR — The signal-to-noise ratio is displayed in the panel. Higher SNR means more reliable centroid measurements and smoother guiding.
Multi-Star Guiding Display
Section titled “Multi-Star Guiding Display”When PHD2 guides on multiple stars, ARIS overlays reticles on the secondary guide stars in the camera view and shows an MS chip — so you can see at a glance that guiding is locked onto many stars rather than one. Multi-star guiding averages out seeing on any single star and produces smoother corrections.
Aggressiveness
Section titled “Aggressiveness”Aggressiveness controls how strongly the guider corrects for measured errors. These settings are accessible from the guider settings screen (gear icon).
What you set is what PHD2 runs: the sliders write directly into PHD2’s guide algorithm, and the values shown are read back from PHD2 itself rather than echoed from your last input. ARIS also re-applies your settings whenever PHD2 restarts — PHD2 only persists runtime changes on a clean exit, so without the re-apply, a crash or a guider restart would silently revert you to profile defaults.
RA Aggressiveness
Section titled “RA Aggressiveness”Controls the correction strength for Right Ascension errors. Range: 0-100%.
- Higher values — Correct errors more aggressively. Faster response but can cause oscillation if set too high.
- Lower values — Gentler corrections. More stable but allows errors to persist longer.
- Recommended starting point — 70-80% for most mounts. Reduce if you see oscillation in the RA guide graph.
Dec Aggressiveness
Section titled “Dec Aggressiveness”Controls correction strength for Declination. Often set lower than RA because Dec errors tend to be slower-moving drift rather than periodic oscillation.
- Recommended starting point — 60-70%. Increase if you see persistent Dec drift that is not being corrected.
Dec Guide Mode
Section titled “Dec Guide Mode”Determines when Dec corrections are applied:
- Auto — Corrects in both directions. Suitable for most situations.
- North only / South only — Only corrects in one direction. Useful when backlash in the Dec axis causes overcorrection. Set this to the direction of your polar alignment drift.
- Off — No Dec guiding. Only use this if Dec is stable and you want to avoid backlash-induced oscillation entirely.
Settling and the Guiding-Stability Gate
Section titled “Settling and the Guiding-Stability Gate”Whenever guiding starts or resumes — after a slew, a meridian flip, or an autofocus run — ARIS uses PHD2’s settle criteria to decide when tracking is stable enough to image. You will see the guider re-acquire the star and settle before captures continue.
During sequences, a guiding-stability gate runs before every frame: if the guide star is bouncing beyond the stability threshold, the sequence holds at the frame boundary and resumes automatically once guiding settles. This prevents wasted subs during wind gusts or passing haze. See Sequencing for how the gate fits into an automated night.
Dithering
Section titled “Dithering”Between frames, a sequence can dither — shift the pointing a few pixels — so hot pixels and fixed-pattern noise land on a different part of the target in every sub and average out of the stack. Set the dither distance and how many frames run between dithers in guider settings.
ARIS chooses the dither vector itself, and the choice is deliberate on both axes:
- Exactly your distance, in a random direction. Every dither travels precisely the configured Dither Distance — randomness lives in the direction, which is what decorrelates frames. A constant distance means every dither pays the same, predictable settle cost, instead of some dithers settling in seconds and others taking half a minute.
- Bounded around the target’s anchor. Dithers stay inside a small box around where the target was centered, so hours of dithering can never creep — the accumulated walk cannot drift the field across the sensor and erode your stacking edges over a long night.
Dither and settle events are marked on the guide graphs, so a dither’s spike is labeled as a dither — not mistaken for a guiding problem — and you can see exactly how long each settle took.
Guiding Quality Metrics
Section titled “Guiding Quality Metrics”The rig continuously measures guiding quality while the guider runs and reports it on the guider status:
- Windowed RMS — tracking error over recent windows, per axis and combined, so a rough patch is visible as it happens rather than diluted into a whole-night average.
- Oscillation — whether corrections are fighting themselves (overcorrecting back and forth). A high oscillation reading is the classic sign aggressiveness is set too high.
- Settle times — the median and 95th-percentile time to settle after dithers and guide starts. If p95 is far above the median, occasional settles are dragging on and costing imaging time.
- Star-loss counts — how often the guide star dropped out.
The same metrics land in the night journal, so a settings change can be judged against numbers from the previous night instead of by feel.
Guide Optics
Section titled “Guide Optics”Tell ARIS how your guide camera sees the sky in Settings → Change Equipment, in the Guiding section. The guider settings screen shows the saved setup in its Guide optics card, with a Change in Equipment Setup link back to the same place.
Pick the picture that matches your rig:
Off-Axis Guider (OAG)
Section titled “Off-Axis Guider (OAG)”An OAG picks off light from the main optical path using a small prism near the sensor. The guide camera works at the main telescope’s focal length, so there is nothing else to enter. Advantages:
- No differential flexure — the guide camera sees the same optical path as the imaging camera.
- More accurate guiding at long focal lengths.
Trade-offs:
- Smaller field of view makes guide star selection harder.
- Guide stars may be dimmer depending on prism position and vignetting.
Guide Scope
Section titled “Guide Scope”A separate small telescope mounted on top of or alongside the main scope. Choose yours from the list, or enter its focal length and aperture. Advantages:
- Wider field of view with more guide star options.
- Easier to set up and focus independently.
Trade-offs:
- Differential flexure between the guide scope and main scope can introduce errors, especially at long focal lengths.
- The guide image may shift relative to the main camera over the course of a session.
For either choice, pick the guide camera from the list, or choose Another camera and type its pixel size and resolution. Equipment Setup shows the resulting guide focal length, guide scale, and guide field as you go.
Cameras with a Built-In Guide Sensor
Section titled “Cameras with a Built-In Guide Sensor”A ZWO Duo camera, such as the ASI2600MC Duo, has a guide sensor inside the camera body that looks through the main telescope. Equipment Setup starts a Duo on Off-axis guider with its Built-in guide sensor. If you guide with a separate guide scope instead — for example, a dedicated guider for narrowband imaging — pick Guide scope and choose that guide camera. ARIS then ignores the built-in sensor.
PHD2’s Focal Length
Section titled “PHD2’s Focal Length”PHD2 needs the guide focal length to report guiding in arcseconds. Equipment Setup shows the focal length PHD2 is using next to your guide optics.
Applying equipment never changes PHD2 on its own. When PHD2’s focal length differs from your guide optics, ARIS asks after you apply, and the guider settings screen offers Update PHD2 until the two agree. The update restarts PHD2, which takes about 15 seconds, so it is not available while PHD2 is guiding — stop guiding first. If the rig reports that it cannot change PHD2’s profile, ARIS shows PHD2’s value and asks you to set the guide focal length in PHD2 on the rig.
Quick Reference
Section titled “Quick Reference”| Metric | Good | Marginal | Poor |
|---|---|---|---|
| Total RMS | < 1.0” | 1.0-2.0” | > 2.0” |
| Guide star SNR | > 15 | 10-15 | < 10 |
| RA aggressiveness | 70-80% | — | — |
| Dec aggressiveness | 60-70% | — | — |